katherine summer * couturière

Fine Dressmaking in the San Francisco Bay Area

22 December 2012

Discarded to Divine


This year I'll be participating in the Discarded to Divine charity event! Put on by the St. Vincent de Paul Society, the event will be hosted by the de Young Museum, where there will be an exhibit of the entries on April 12, 2013. This year's inspirational theme is Girl With a Pearl Earring, which will also be on display at the  museum as part of the Vermeer exhibit.  

discarded to divine


Yesterday I picked up my fabric from the SVDP Wellness Center, which will be the recipient of the event's fundraising.

"The Ozanam Wellness Center began in 2009 to more effectively and compassionately meet the needs of the most vulnerable individuals in our City who are struggling with addiction and mental health issues. By combining the "best practices" of spirituality and clinical methods, we are addressing the whole person who is suffering, and empowering our guests to make positive changes for ongoing recovery. The overarching vision of the Wellness Center is to foster right relationship: justice, love and peace among all who pass through our doors, with a special focus on those who are struggling with addiction to drugs and/or alcohol and mental health issues."

I ended up choosing this pale seafoam faille, and was thrilled to get about 15 yards of it along with at least the same amount of vibrant chlorophyll green shantung silk.  The donor was an event planner who used them to decorate spaces, hence the extravagant amounts.  This will allow me to do something really spectacular, since I can't generally afford to buy nice fabrics in those amounts. 

seafoam silk faille

The faille looks a little bluer than it actually is--has a more minty tone in real life.
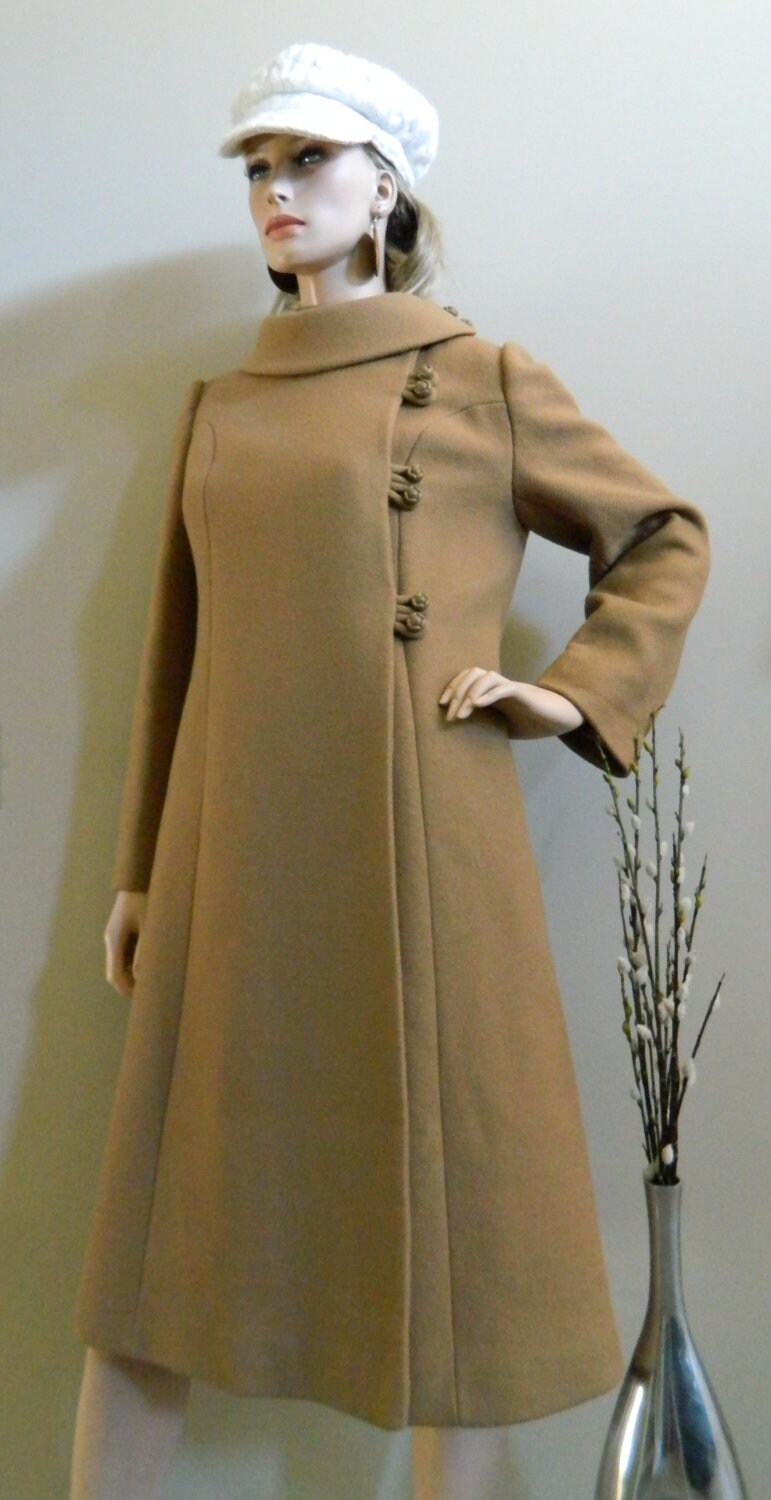

I don't want to create a fully historical garment or interpret the theme too literally though.  The look I'm going for is late 1950's early 1960's vintage--very tailored dressmaking with the hair up in a twist, opera gloves, and some kind of beaded clutch.

At first I thought I'd do something similar to this--double breasted with a stand away neckline, but full length.  The lining would have been the emerald silk, and I considered doing an emerald gown underneath.  I wanted to do emerald beading all over the front of the coat and over one of the shoulders.


But then I decided that I wanted to do something extreme with tons of volume.  
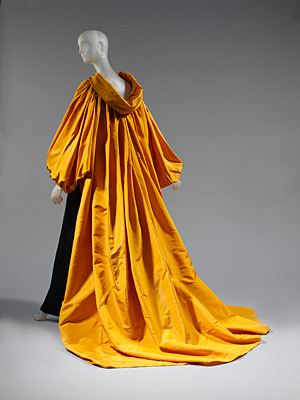


faille evening coat


This golden YSL opera coat from the collection of Mrs. Thomas L. Kempner already looks like it could have been inspired by the painting.  It's quite similar to what I am imagining for the outerwear.


 Except I think I'm going to do it with 3/4 length sleeves that are very loose at the hem, as opposed to fitting closely around the forearm. The fullness will be created using cartridge pleats, since that's what's on the back of her garment in the painting.


Depending on the gown, I might even do a funky coordinating hat like the one the man in the red jacket has on in this other Vermeer painting called The Procuress.  Then the look would be more mid-late sixties.

Wait...is he grabbing her boob?  Ooh.  Well yes, apparently he is--Wikipedia tells me that this is a brothel scene.  And I learned that there are not one but two women in this painting. 

dutch brothel scene

Who knew that Discarded to Divine would lead an education on the popularity of Dutch Bordeeltjes in 17th century?  Here's a particularly creepy German example from the 15th century.

german brothel scene


Here are some rough sketches that I have so far.


You want to know something crazy?  I made this beaded trim ages ago, and I bought the lace to go with it, but I never figure out exactly what to use it for.  Having this on hand makes me feel ahead of the game.  Unfortunately this is a terrible terrible photo.  I'll have to take one with the good camera.

beaded fan trim

Here's a cartridge pleat sample that I did last night.

discarded to divine


And an experiment for the cowl on the coat

faille cowl coat

If you can't tell, I'm super excited about this project, and since the semester just ended, I'll be able to devote the kind of attention to it that it deserves. 

But the best part?  If you're a designer anywhere near the San Francisco Bay Area, you can do it too!  They have some really awesome donations of fabric and clothing just waiting to be turned into something fabulous.  Because it's still early in the process, it isn't all picked over.  There's a bolt of orange cotton velvet, a bolt of something striped like a pink seersucker but heavier and without the bubbling, huge bags of fleece scraps in several different colors, and much more.

Sally Rosen is the contact person (415-552-5561 X306), and you'll need to call her and make an appointment to go search through what they have set aside for the event.  I know I posted the link already at the top, but here it is again. Hours of the wellness center (Howard between 7th and 8th in the city) are 9am-4pm Monday through Friday.  Do it for a great cause!!!

27 September 2012

Portfolio Images

Accepting the fact that my website is perpetually under construction, I felt it prudent to create a post showcasing some of my more exciting work. 

My strongest professional capabilities are in bridal and eveningwear.  I enjoy the level of diligence and extravagance allowed by the category.

This made-to-measure gown was created completely from concept for Marilee Talkington, a fiery actress with a singular vision for her black-box theater wedding.   The skirt texture, inspired by tropical leaves and flowers, was created from 8 yards of silk organza stitched onto tulle and layered over crepeback satin.  The fully boned bodice is the same satin ruched onto panels of cotton drill. 

offbeat bride red


My other great love is dance costuming.  I find that ballet and bellydance present the most opportunities for creating finely detailed works of art. 

This fully wired and strung classical tutu is made for the professional lead ballerina.  Basque and bodice are satin covered coutil. English cotton bobbinnette knickers support 12 layers of point cut hand pleated tutu net (not tulle) ruffles.  Corset and top-skirt feature black chantilly lace, black point d'esprit, hundreds of black diamond rhinestones, and vintage glass buttons.  You can see and read about the tutu in progress in this post, which I was recently surprised to find has more than 3900 views as of yet!

classical ballet tutu


One of the highlights of my career was designing and creating several key looks for Cari Borja's runway show on the Gala Night of 2006 San Francisco Fashion Week.  The Gala Night celebration also featured runway shows by bay area couturiers Lily Samii and Colleen Quen.  Cari's unorthodox construction methods turn "proper" sewing on it's head and, over the course of my time with her, was a liberating experience in terms of technique.  This gown was created with several circular layers of point d'esprit and printed peau de soie.


San Francisco Fashion


 Here's another look from the same runway show but at a different venue.

wool flounce dress
 

This trumpet silhouette illusion gown was created for a traditional coastal North Carolina ceremony.   The cotton/rayon bengaline gown features beaded lace hand applied to netting and finished with a silk satin sash.  All crinoline and support layers are built into the gown.


Of course, my portfolio is in no way complete without showing at least a detail one of my bedlahs, the matching bra and belt sets for bellydancers.

Bra and belt bases are first covered with silk dupioni and then lavishly adorned with trims and hand-beaded fringes.   Precious stones, czech glass, delicate beads, and Swarovski rhinestones catch the light, accentuate shimmies, and give extra impact to pops and locks.

raks sharki costume


I'm also available for simpler tasks such as alterations, but I think you can see that my more substantial talents involve one-of-a-kind pieces that are graceful, feminine, and luxurious.

If you, or someone you know is looking for something truly spectacular please feel free to pass along the link to this post. 

Resume and references are available upon request.

05 September 2012

Guide to Bridal Lace

bridal laces


Lately I've been having more bridal inquiries than usual, and lots of these ladies are asking for lace.  
With the intention of familiarizing my current and future clients with the most popular bridal laces, I'm putting together a short picture glossary along with some images of gowns made from them.


Alencon 
(uh LEN sahn)
The distinguishing feature of this lace is the fine cording that is applied to the outlines of the motif.  Although still delicate, this fabric has more body and structure than something like chantilly.
alencon lace
Credit
alencon lace bridal gown
Alencon example by Jim Hjelm


Brussels Lace
Very delicate elaborate lace, often lots of raised work like what you see in the centers of the flowers. You don't see this much on modern gowns--it is very old fashioned.

brussels lace
Credit

brussels lace
Credit

brussels lace gown
Credit

Chantilly
A very fine airy lace, usually with lots of detail and elaborate motifs.  Like Alencon, Chantilly often (although not always) has a cord outlining the motifs, but it is much more delicate.  This lace pairs quite nicely with other airy fabrics like tulle, chiffon, and georgette.  It is my personal favorite out of all the laces.

chantilly lace
Credit

chantilly lace
Credit
chantilly lace bridal gown
Both chantilly examples are by Rosa Clara


Duchesse Lace
Duchesse is supposedly the cheaper version of Brussels lace, but I can't always tell the difference to tell you the truth.  The joins are of cruder constructon or something like that.  It has lots of open space, as opposed to the tighter net background of chantilly and alencon. 
Kate Middleton kept popping up when I was looking for gown examples.  But I think that's because she is a duchess, not because her gown had duchesse lace.
duchesse lace

Credit
duchesse lace cape

Eyelet
Not considered a "true" lace because it is worked on a fabric background, eyelet is typically made from cotton. Best suited to casual outdoor weddings, it is also a popular choice for flower girl dresses.

cotton eyelet dress


 Guipure Lace also called Venise Lace
(Gee pee oor...I think...)
*Edit* according to my friend, it is pronounced guy-pure

Guipure is much heavier and more textural than the other laces and as such is often used on gowns for winter weddings.  Often called Venise lace (no, I did not misspell that although I have seen it spelled Venice too), there is no net or mesh background.  It comes in a huge variety of designs and motifs and is also popular as appliques instead of fabric. 
guipure venise lace


venise lace bridal


There are some gorgeous examples of gowns that use venise lace, but if you don't watch out... 
Hey girl, 1982 called and wants her dress back.

Ugly 1980s Wedding


Schiffli Lace 
(SHIF uh lee)
Lace pattern is embroidered onto a net backing fabric.  The patterns in the other laces are created when the lace itself is created.  It is particularly nice as an overlay fabric on top of tulle.  There is some ambiguity when it comes to schiffli lace--the term is used in several different ways.  It is often referred to as tulle lace or organza lace because these are almost always the backing fabrics.

Additionally, if you google schiffli lace, you will see lots of references to something called chemical lace, and you will see photos of what looks like venise lace.  Chemical lace is created by embroidering with one type of fiber onto a fabric of another type of fiber.  Then the fabric background is chemically disolved leaving only the embroidery behind. 

schiffli lace


I thought that Kate Middleton's gown was schiffli.  It certainly has that look from a distance.  But according to Wikipedia the bodice design was created by stitching lace appliques onto the netting.

"The lace bodice design was handmade using a technique that originated in Ireland in the 1820s called Carrickmacross, which involved cutting out rose detailing (symbolising England), thistles (Scotland), daffodils (Wales), and shamrocks (Ireland), individually applying them to the ivory silk tulle." --Wikipedia


 There are of course, dozens more types of lace.  These are just the basics of bridal lace vocabulary.

You might also want to have a look at my post on Bridal Necklines.


29 August 2012

Tutorial: Sewing Leather Piping

Lately I've received an exciting commission--a dress for the coordinator of the San Francisco TED talks.  She's also the MC for the event, so not only will she be onstage several times during the day, she'll be on video.  DUH IT HAS TO BE PERFECT.

The contour fitting dress is made from a heathery grey wool blend ponte knit with deep aquamarine suede contrast piping in the seams.  Yesterday afternoon she came over for a fitting, and Va Va Voom!!!!  I wish I could show you pictures, but you're just going to have to wait until after the event to see it.  But here's my practice sample so you can get an idea of what's going on:

sew leather piping


I don't work much with leather.  It has some properties that make working with it a very different experience than working with most fabrics, and I'm only remotely familiar with some of the techniques.

There's no way to pin it all together because of the leather--any pin or needle holes will be permanent.  You can use paperclips or bulldog clips, but I don't have any of those.  Nor do I have any double sided tape to fold the piping in half and keep it that way.  Additionally, this method necessitates silicone needle lube to keep the needle from gumming up when it pierces the tape inside the piping--don't have any of that either.  Nor do I have a walking foot for my machine, and if you have ever sewn on leather you know how much it stretches and moves--a walking foot keeps this migration from occurring.

My client was coming over the following day, so I needed to come up with a solution.  Something I tell my students regularly is that sewing isn't always about knowing the proper technique--it is about problem solving.  You really do have to puzzle it out for yourself sometimes.

Here's what I came up with.

You will need:
Leather
Fabric
Thread
Teflon presser foot
wax pencil
leather needle

Step 1: Determine the Width of your Piping
Figure out the width of your piping.  Add the width of your seam allowance to the desired width of your piping.  Then double that.

 For instance, my seam allowance is 3/8".  I want a small piping of 1/8".   3/8"+1/8" = 1/2".
1/2"x 2 = 1"  so my piping should be 1" wide.

HOWEVER.  I am going to add another 1/8" to my 1" total to compensate for the fold.  If I were working with a thin crisp easily ironable fabric such as shantung or muslin, I might skip this step, but not for leather.  So the final width on my piping will be 1&1/8".

Step 2: Cut your Piping
I use a rotary cutter and clear plastic quilting guide.
I also like to draw an arrow onto the hide with a wax pencil.  Leather has a grain.  It isn't like fabric grain, but I'm working with suede.  I want all the piping to be on the same grain (pointing up or down) on the dress.  Otherwise the coloration could be off.  Kind of like when you stroke velvet one way and it looks one color--stroke it the other way and the color changes.

leather grain

As soon as I finish cutting one piece of piping, I mark the arrow on the next one.  When I sew the garment, I make sure that all the arrows are facing either up or down.

Step 3:  Stitch Piping on to one side of the fabric.
Compared to most knit fabrics, the ponte knit that we are using is fairly structured.  A wool, lycra, and something else (poly I think) blend.  A less firm fabric will probably not work very well.

Use a teflon presser foot so that the foot doesn't pull and stretch the leather.  This is one of the main challenges when working with leather on a home machine, so this part is really important.  This also means that you don't have to use baby powder on your leather, which can be messy.

teflon presser foot


The fabric needs to be on the bottom touching the feeddogs.  The leather will be on top touching the teflon foot.  Make sure everything is right sides together.

Also use a leather needle.  These have a tiny blade in addition to the needle point to help slice through the leather rather than just puncturing it.

Last, your needle position should be a click towards the edge.  So if my seam allowance is 3/8", I line up the edges of the fabric and leather with the 3/8" groove on the throat plate, but I adjust the needle position so that it is slightly right of center (or left of center if your raw edge is on the left).  Your machine might not have as many needle position options as mine, so you might need to compensate with the position of your fabric rather than the position of your needle.

needle position


Step 4: Mark your Notches
See that little tiny clip by my finger?  That's the notch.  You might be used to seeing something that looks more like this if you are used to commercial patterns instead of industry.

professional sewing notch


Your notches MUST line up.  To achieve this, find the notch and use your wax pencil or crayon to mark its location.  Then directly across from that make another mark.  The notch on the other piece of fabric will align here.   Repeat this for each notch on the seam, and also the top and bottom.

leather notch


Step 5: Stitch Piping to the other piece
Line up the notches on the piping with the notches on the matching piece.  Sew the piping to the fabric in the same way as step 3, with the piping on the top and the fabric on the bottom.

Step 6: Complete the Seam
On the wrong side, fold the piping in half so that the notches meet.  Sew seam at your proper seam allowace.  Don't forget to readjust your needle position back to center.


control seam bubbling


See the bubbling next to the foot?  If your fabric starts to do this as a result of being pushed by the presser foot, you can control this with a pin like so:

control seam bubbling

Step 7: Steam the seam to the correct side
I didn't place the iron directly on my fabric with any pressure, but I did use steam to push my seams towards the center front and center back respectively.

That's it!  I hope this is helpful!  If you have any questions, or if it seems like I left something out or need to expand any explanations please let me know.

25 August 2012

Opportunity--A Euphamism for Production Woes. Part the First.

For years now I have been terrified of the production process.  I've read books, taken classes, and developed numerous designs that I would like to have made.  I've also heard horror story after nightmare regarding the pitfalls of manufacturing.  ESPECIALLY for naive beginners.  

Why am I even saying that?  Betsey Johnson recently declared bankruptcy, and that was AFTER Steve Madden, who acquired the brand in 2010, excused a $48 MILLION DOLLAR LOAN.  


Did you hear me?  
I SAID HE LET THEM OFF THE HOOK FOR A $48 MILLION BUCKS.

If people with this many years of experience and this much money are failing...  well, clearly the prospect is more than intimidating.

However.  

I am a brave lady who does not like to shy away from challenges.  And so when my dear friend Dusty (also a production virgin) said that she was going to be manufacturing a small run of gorgeous stretch velvet super bootie skirts, I asked if I could jump on her bandwagon.  
super bootie skirt

One of the biggest advantages of this is that we can split the fabric cost.  Dusty's skirts take up a lot of fabric.  My tops  need very little.  In fact, in the cutting layout (called a marker), my tops fit very neatly in between her skirts, so they actually took up no extra room, fitting in what would have been the scraps had she done this by herself. 

Also, having someone else to go through this with made the process less daunting.  And Dusty is what I would call GOOD COMPANY.   

Mistake #1
Our cutter told us that we needed to order our fabric before he would create the marker.  Presumably this is because he didn't believe us when we said that our useable width was 58".  So we estimated our fabric needs based on making one garment.  We knew that we'd have economy of scale but no realistic idea of how much.  
The result is that we ended up with way more fabric than we needed.   This ended up not being a terrible thing because we had enough to do another run, but that is another story.

Lesson #1
GET YOUR MARKER MADE BEFORE YOU ORDER YOUR FABRIC.  Is this always the way to do it?  I can't say--I am sure there are reasons to order the fabric first, but not in our case, which is a very small run.  


Mistake #2
The fabric, all 224 yards and 7 colors of it, was delivered to her house, wrapped in opaque protective plastic.  Did we at least cut open a little window to check the colors like smart little girls?  NO.  NO WE DID NOT.  So when we picked up our leftover fabric  from the cutter, all the colors that we ordered were there except for one.  Instead of the olive green velvet that we had ordered, we had a taupe, very much like a raw umber Crayola--remember those?

Lesson #2
Check your inventory as soon as you receive it.  Our source would certainly have let us exchange it.  Luckily we liked the color, and it sold well.  But what if we'd gotten canary yellow or something?  

Another problem that I had was that my top has a contrasting fabric band around the bottom.  My top is a pull-over.  Which means that all the fabric has to stretch enough  to get over the shoulders.  Just because a fabric has elasticity does not mean that it has equal stretch on the straight grain and the cross grain (horizontally and vertically).  This is just one reason that you need grainlines on your pattern pieces, which I did.  

However, when I got my sewn tops back, the band was very tight.  You can still get the tops on, thank goodness, but they do not have the right stretch--the cutter cut them on the cross-grain instead of the straight grain.  I asked my sewer why she didn't call me, and she said it was because there was still stretch--she would have if there was no stretch.  

Mistake #3
I did look at the plotted pattern pieces after the cutter had digitized and graded (made the different sizes) them, but I didn't look carefully enough.  Had I done so, I would have seen that the grainline was erroneous.  

Lesson #3a
Check your plots carefully.
Lesson #3b
Draw your grainline with a black sharpie.  Make it so that nobody with half a brain could miss it.  Not that my grainline wasn't legible in the first place.  This is incontrovertibly the cutter's fault. But I am finding that everything must be crystal clear, or you can expect problems.  Nay--you can depend on them.

Would you like to see the fruits of our labor?  
You can purchase the tops here and the skirts here, and we're offering a deal if you want to buy a matching set--details are in the listings.

asian costume

chinese costume

asian top

chinese top

chinoiserie costume

opium den costume